Thursday, June 30, 2011

Day 4 of 4th of July recipes and crafts

Today's recipe is called Patriotic Drink.  I just had to throw in something cool and refreshing for those hot July days.  I am so excited to try this recipe and I am sure that the kids will really love it!  (FYI:  This is NOT my child!!)

Patriotic Drink

Ingredients
  • Ice cubes
  • Cranberry juice
  • Wild Berry flavor Gatorade Fierce
  • Diet 7-Up
Instructions
  1. Fill a clear glass with ice cubes. Pour the drink with the most sugar (check the nutrition label) into the glass. For our red, white, and blue recipe, start with the cranberry juice.
  2. Very slowly add a beverage that contains less sugar -- in this case, Wild Berry flavor Gatorade Fierce. Be careful to pour it onto an ice cube -- not directly into the other drink -- to keep them from mixing.
  3. Use the same technique to add a layer of Diet 7-Up.
Recipe courtesy of Family Fun Magazine.


Today's craft is String of Stars
String of Stars

Materials
  • Craft Foam
  • Scissors
  • Tacky glue
  • Hole punch
  • Ribbons
Instructions
  1. Cut out a bunch of craft foam stars that measure five or so inches across.
  2. Next cut out smaller stars of contrasting colors and use tacky glue to attach each one to a larger star.
  3. To finish, use a hole punch to make two holes in each glued pair, then thread lengths of ribbon through to tie them together.

Craft courtesy of Family Fun Magazine.

Wednesday, June 29, 2011

Day 3 of 4th of July recipes and crafts

Today and tomorrow are going to be crazy busy because I am getting ready for Alyssa's 3rd birthday party!  I can't believe she is already 3 and will be going to Preschool in the fall.  It's exciting but sad at the same time.  My little baby is growing up.  I am using a new recipe as one of the side dishes for her birthday so I will post more on that later.  Also, maybe after her party, I will be able to make some of these 4th of July treats I have been *dying* to try.

Today's recipe is 4th of July Jigglers.  I have seen (and eaten!) the layered salads and I am sure this tastes just like that but in fun star shapes.


Ingredients

  • Two packages (4 serving size) or one package (8 serving size) any flavor red gelatin (e.g., JELL-O)
  • Two packages (4 serving size) or one package (8 serving size) blue gelatin (e.g., JELL-O)
  • Whipped topping (e.g., Cool Whip) 
  • 2-1/2 cups boiling water
  • Mixing bowls
  • Measuring cups
  • Rubber scraper or large spoon
  • Table knife
  • Two 9x9-inch pans (or you can do it in one pan, one flavor at a time)
  • Clear plastic cups (4 to 6 ounce size)
  • Star-shaped cookie cutters
  • Large tray
  • Cherries (optional)

Cooking Instructions

  1. Pour one flavor of gelatin into the mixing bowl. Add 1 1/4 cups of the boiling water and use the rubber scraper to stir until all of the gelatin has dissolved (about two minutes). Pour the mixture into one of the pans. Repeat with the other gelatin flavor.
  2. Put the pans into the refrigerator and let the gelatin chill for about three hours.
  3. Put about an inch of warm water into the sink. Dip just the bottom of the pan (don't let the water come up over the sides) into the water for just a few seconds. (Note: Be careful to not let it sit too long or the gelatin will start to liquify.)
  4. Wash your hands thoroughly. Use the star-shaped cookie cutters or the table knife to cut shapes. Use your hands to lift out the shapes onto another tray. Repeat with both flavors.
  5. Place a thin layer of  jigglers (blue or red) onto the tray, then add a layer of whipped cream. Alternate the jigglers and the whipped cream until you have a stack of jigglers. Top with a cherry if you would like and enjoy!

Recipe courtesy of Kaboose.com.


Today's craft is Red, White and Blue Garland.  This craft is really easy and I bet many people have the supplies lying around. 


Tools and Materials
Letter-size, stationery-weight paper in red, white, and blue
Paper cutter or scissors
Ruler
Pencil
Bone folder
Mini-stapler
1/8-inch hole punch
White cotton string

Red, White, and Blue Garland How-To

1. Cut paper to 6 by 11 inches. Using a bone folder to make crisp folds, fold the paper in half; then, fold it in half twice more. Open the folded paper, and use the creases as guides to accordion fold the paper to resemble a fan.
2. With the paper still folded, find the center, and mark it with a pencil. Use a desktop stapler to staple the center. (The staple should be perpendicular to the folds.)
3. Make a mark, 1 inch from each end on the folded side of the fan. Using scissors, trim both ends of the paper on an angle, starting from the 1-inch marks and cutting to the paper's edges.
4. Fan out the paper to form a star, and bring the ends together. Staple the ends together with a mini-stapler.
5. With a 1/8-inch hole punch, punch 2 holes, one fold apart from each other. Thread cord through one hole, around the back of the star, and then through the other hole.


Craft courtesy of MarthaStewart.com.

Tuesday, June 28, 2011

Day 2 of 4th of July recipe and craft

The 4th of July recipe for today is Patriotic Pops.  I can't wait to make this recipe with the kids!

null
Ingredients
  • 2 cups blue Powerade, Gatorade, or Kool-Aid
  • 12 5-ounce disposable cups
  • 1 cup frozen whipped topping
  • 1 cup vanilla yogurt
  • 12 craft sticks
  • 2 cups cran-raspberry juice
  Instructions
  1. To make the pops, equally divide the blue juice among the plastic cups, then place the cups in the freezer until the juice is partially frozen, about 30 to 45 minutes.
  2. Mix together the whipped topping and yogurt and divide this mixture among the cups.
  3. Set a craft stick in the center of each pop and return the cups to the freezer for approximately 45 minutes.
  4. For the final layer, add the cran-raspberry juice to the cups and place them in the freezer until solid.
  5. To remove the pops, run warm water over the outside of each cup.
This recipe is courtesy of Family Fun Magazine.


The craft for today are Fireworks Shirts.
null
Materials
  • Plain T-shirt
  • Newspaper
  • Glittery fabric paint
  • Paper plate
  • Pipe cleaners
Instructions
  1. Start by placing a few sheets of newspaper inside a plain T-shirt.
  2. Pour one or more colors of glittery fabric paint onto a paper plate.
  3. Create a stamp (for each color paint) to print fireworks: arrange four pipe cleaners in a bunch, pinch the center, then bend all eight ends over your thumb and twist them together a few times, forming a loop. Spread apart the ends and bend up the tips, as shown.
  4. To use the stamp, dip it into the paint so that it's evenly coated and press it firmly onto the fabric.
  5. Once you've finished your design, allow the paint to dry thoroughly, and refer to the paint manufacturer's directions before laundering the shirt.

This craft is courtsey of Family Fun Magazine.

Monday, June 27, 2011

two winners and 4th of July

So today my daughter drew names of the two winners for the spin pin giveaways and they are (*drum roll*) Amanda and Kelli (Elijah's mom)!!!  Congratulations girls!  Make sure to message me about which color you need (blond, light brown or dark brown).

So this is the week before 4th of July.  In celebration of the United States independence from England, I am going to be posting a yummy dessert recipe and a fun craft that is red, white and blue everyday this week.
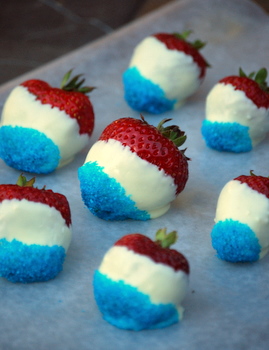
Our 4th of July recipe for today is Red, White and Blue Chocolate Dipped Strawberries.  They look so yummy and take very little time to make.  


Red, White and Blue Chocolate Dipped Strawberries

Just like any other chocolate-dipped strawberries, the method for making these is very easy. There is only one additional step: dip the tips of the strawberries into some blue sprinkles or blue sanding sugar once they have been dipped into the chocolate. Blue sprinkles or jimmies have a bold color to them and look cute on the strawberries, but blue sanding sugar, which I used for the strawberries here, gives the berries a little bit of a sparkle. The color of the sprinkles will not stand out well on milk or dark chocolate, and you won’t get the same visual effect as you do with white chocolate. That said, if you really want to incorporate milk or dark chocolate, just double dip the berries first into the chocolate of your choice, let that layer set up, and continue on with the white chocolate and sprinkles.

Store the berries in the refrigerator until you’re ready to eat them, as white chocolate is a little more heat-sensitive than other chocolates. The berries are best within a day or two of being made.

Red, White and Blue Chocolate Dipped Strawberries
1 pint fresh strawberries (approx 12 oz)
4-oz white baking chocolate
Blue sanding sugar or sprinkles
wax or parchment paper

Line a baking sheet or cutting board with wax paper or parchment paper.
Chop up the chocolate roughly with a knife if it is in block form. In a medium-sized, microwave safe bowl, melt the chocolate in the microwave. Heat it in 45 or 60-second intervals, stirring between each time to ensure that the chocolate is melting evenly and not burning. Meanwhile, place blue sanding sugar into a small bowl and set it aside.
When chocolate is smooth, dip the berries 3/4 of the way into the chocolate, dip the tips into the blue sprinkles, and place on wax paper.
Berries can set at room temperature if you live somewhere cool, otherwise refrigerate them until ready to serve to allow the chocolate to set up

Recipe courtesy of Baking Bites.


Our 4th of July craft for today is Holiday Lanterns.  I remember making these when I was little and I always thought they were fun. 


Lantern How-ToCut construction paper to 6 by 9 inches; fold in half lengthwise. Fold edges back 1/2 inch for rims, and crease; unfold. Glue a 1/2-by-9-inch strip of decorative paper on each rim. Cut slits from middle fold to rims, spacing 3/4 inch apart. Shape into lantern: Open paper; bring the ends together to overlap slightly; staple. Staple 3/4-by-8-inch paper handle inside lantern. Glue on construction-paper stars (made with a craft punch).

Craft courtesy of MarthaStewart.com

Sunday, June 26, 2011

impromptu picnic

Hey everyone!  Remember to check out my giveaway and enter here if you haven't already!  It ends tonight and I will be picking two winners tomorrow!!!  I hope you win!

Today was a fun, lazy day!  After church my hubby and I decided to get Burger King for lunch (healthy, I know!) and the kids fell asleep in the car on the way home.  They rarely fall asleep on the way home.  They stayed asleep when we got home so we opened the car doors and had a picnic on the front lawn.  Here are some pictures from the picnic after the kids eventually woke up:


Alyssa wanted to get right in the camera!


Malachi trying to feed Alyssa french fries
 

Wednesday, June 22, 2011

Summer Bucket list

So this summer I decided to put together a bucket list for the kids with different activities that we want to do.  Every year I have one but it's usually pretty limited.  The past three summers my kids were pretty young and we didn't venture out very much.  This year both of them are old enough and they enjoy doing similar things.  This is the list that I came up with (these activities are geared towards a 3 year old and a 1 and a half year old):

Picnic in the Park
Visit a local water park
Participate in the library summer reading program
Camp out in the backyard
Go to a 4th of July parade
4th of July fireworks
Domino's Petting farm in AA
Zoo
Local Farmers market
Finger painting
Make banana splits
Make ice cream sundaes
Play in the sprinkler
Paint with water colors
Make doughnuts
Armada fair
Visit a nursing home
Blow bubbles
Stargaze at Meme and Papa's
Roast marshmallows
See an outdoor movie
AA Children's Museum
See a "cheap" movie with Alyssa
Metro Beach
Make a red, white and blue dessert
Make smores
Outdoor bowling
Ride bikes to get ice cream
Troy Museum and Historical Village
Sterling Heights Nature Center
IKEA
Great Lakes Crossing
Bunert One Room School house
Fountains at Warren City Square

I will be crossing out as we do things on the list and posting about it.  What's on your bucket list for the summer??

P.S.  Maybe I should make a bucket list of crafts I want to make because there are like a billion I want to try!

Tuesday, June 21, 2011

My first giveaway!

This is the first giveaway on my blog and I am super excited!  Since the giveaway is in honor of me completeing 10 hairstyles in 10 days, I am going to be giving away Goody spin pins to two winners!  These spin pins come in three different colors (blond, light brown and dark brown) and do the work of like 20 bobby pins.


Rules:
*To enter, follow my blog and leave a comment about which 10 for 10 hairstyle was your favorite and which hairstyle you would try on yourself. 
*One entry per person
*The contest will end at midnight on June 26th, 2011

Monday, June 20, 2011

Hairstyle #9 and #10! Finally done!

This 10 for 10 challenge was really quite a challenge for me.  It kept me posting on a regular basis and I had to make sure that I did my hair differently for 10 days.

This weekend we went from one side of the state to the other so I had limited internet access and didn't really have time to post.  I also recreated my hair style from Sat. because I forgot to take pictures.

Here is hairstyle #9 (recreated):

From the front

From the back
Sat. morning we left for the west side of Michigan for a wedding.  It was nice to have a break from the kids but I did miss them.  This hairstyle took me about 5 minutes to do and I created it in the car right before we walked in for the wedding.  I just didn't think that it would survive a three hour car ride with the windows down.  And no, the air conditioning on my car does not work.  :-(  

Hairstyle #10:


Nothing fancy, just a headband and a low tucked in ponytail.

So there you have it!  My first 10 for 10 finished!  I can understand why people are so relieved after they finish one of these challenges.  It's a lot of pressure.   Since I am finished I am going to have a giveaway for some hair accessories!!!   Stay tuned tomorrow for details of the giveaway!

Friday, June 17, 2011

hairstyle #8

Here is today's hairstyle:

View from the front (with my son)

View from the back
It's a half up bun.  This took me about 5 minutes to do.  Super easy and cute! 

I let my daughter take pictures today and these are a few of the pictures that I got.  I think that she did a good job for an almost 3 year old!  Here is another shot:

Off with her head!!!
I think it's a cute pic of my son but not so much of me. 

So my 10 for 10 is coming to an end soon and I want to do a giveaway when it's over!  My first giveaway, super exciting.  I am thinking some hair accessories......  Watch for details of the giveaway in the next few days!

hairstyle #7 and a new toy (thrift store find!)

Here is yesterday's hairstyle

Pigtails!
I know pigtails are boring but I think they are cute so I decided to throw them in my 10 for 10.

Yesterday, I wanted to try to hit up some garage sales but it was pouring for most of the morning.  So the kids and I hit up some thrift stores instead.  One of the stores was having a 1/2 off clothing sale and I was able to get a few shirts for myself and some cute dresses for my daughter.  (I will blog about those in a later post!)  We also found this toy:


It is an educational clock that is suppose to teach the kids how to tell time.  The kids can move the hands around and it will tell them the time or it can quiz them to see if they can move the hands in the correct position for a certain time.  I thought it was a fun toy.  My kids love it, even though it is a little old for them right now.  I think this was $2 well spent!

Wednesday, June 15, 2011

hairstyle #5 and #6

I didn't take a picture of hairstyle #5 because all I did was throw it up in a ponytail.  It actually looked really cute, I will have to do that more often. 

Here is hairstyle #6:

View from the side


View from the back (sort of)


I think this hairstyle turned out really cute!  I originally had a totally different hairstyle planned for today.  I really wanted to try out a french braided style on my hair.  I have never done french braiding before but it looked cute in some of the pictures that I found.  I found a tutorial on one of the other blogs that I follow and it looked easy enough.  Needless to say, I tried three or four times and it just was not working.  For today though, I still wanted to have a braided style and decided to go with braided pigtails.  When I was finished, they just didn't look all that good on me so I pinned them back on my head and this is what turned out.  Below are the steps for this hairstyle.  I could do a picture tutorial if anyone is interested.

Step 1
Split all your hair in half like you would for pig tails and braid them.  Use ponytail holders at the end to hold the braid.  (Note: make sure that the braids start in approx. the same spot.  One side was lower then the other when I did mine, so it turned out a little lopsided)

Step 2
Holding one braid, cross it behind your head to the other side and pin with a bobby pin.  Take the second braid and cross it on top of the first braid to the other side, and pin with a bobby pin.  At this point, each braid should cross your head in the back, one above the other.  You will also have the ends sticking out.  My ends stuck out right above my ears.

Step 3
Tuck the ends of the braids into the hairstyle and pin with bobby pins.

All done!  This hairstyle only took about 10 minutes and I think it is one of my favorites from the hairstyles so far.

Monday, June 13, 2011

hairstyle #4 and the zoo

Here is today's hairstyle:


Front view

Back view

Side view

Today's hairstyle was super easy and took me less than 10 minutes.  I took a chunk of hair on each side and braided it, one side at a time.  Then met them in the middle and joined them with a hair tie.  I am trying out styles that are quick and easy so I can do them in the morning while my children are playing or finishing up breakfast. 

Today we went to the zoo.  My kids love the zoo and we go there often, with friends and by ourselves.  Today we met up with my friend who is leaving for Hawaii soon.  Her husband has a job there so they are moving at the end of the month.  It was great to see her one last time before she left. 


All the kids

Real Polar bear


All Aboard!!

Sunday, June 12, 2011

hairstyle #3 and Our Anniversary!!

Today's hairstyle was kind of an after thought.  I actually had planned a different hairstyle for today but decided to go with this one at the last minute because I wanted something a little more fancy for church. 


Cute from the front

a mess in the back!!
I am actually kind of embarrassed to show this hairstyle today.  It turned out horribly and I ended up taking it out after church.  The bobby pins are showing and sticking out everywhere.  It doesn't really look anything like I wanted it to or it was suppose to.  We were running a little late so I only had about 10 minutes to try this out.  Maybe with some practice it will look as cute as it's suppose to.

The tutorial can be found here (and what it was suppose to look like!)  I only did the first part of the style that the girl in the video did, not the bun part. 

Today is also my six year anniversary with my husband.  To celebrate, we had a special anniversary lunch from Famous Dave's.  We both love BBQ but don't eat it that often.  We were able to sneak in our special "date" when the kids were taking their naps.  Here are some pictures from our special day six years ago:


Me and my girls

Len and the boys

us at the reception

Our cake

Hairstyle #2 and a wedding

Sorry I didnt' blog yesterday about my hairstyle.  I didn't actually do my hair until right before a wedding we went to and we didn't get home until after midnight. 

So my hair turned out super wavy from hairstyle #1, after I took it out, so I really wanted to work with that.  For this hairstyle, all I had to do was pin up the sides with bobby pins and I was good to go!  The good thing about this hairstyle is it lasted me all night.  Many times when I end up curling my hair with a curling iron, it is flat by the end of the evening.  Not this hairstyle. 

Wedding hairstyle from the front

Another shot from the front

Wedding hairstyle from the back

The wedding reception was at Coach Insignia which is a restaurant in Downtown Detroit on the 72nd floor of the Renaissance Center.  The view was absolutely AMAZING and I got some awesome pictures of Downtown Detroit.  The reception was held on both floors of the restaurant.  This reception was a little different because the bride was Russian and the Groom was Polish and they both incorporated customs from each of their heritage (some of them I didn't understand!).  They had a Polish band that played lots of Polish music, and a few Russian songs!  I really liked the Polish music, it was so much fun!   Unfortunately, they didn't play a single traditional polka.  I really wanted to dance to one! (I am about 50% Polish and 50% German, fyi)  Overall, it was a beautiful reception and we had a good time. 

I will post hairstyle #3 later tonight!

Friday, June 10, 2011

New hairstyles and a 10 for 10

Pretty much since Christmas, I haven't really done anything with my hair.  I always just leave it down because that is the easiest way for me to have it.  Occasionally, I will put it in a low ponytail but that is only when I am working out.  My hair is long and straight.  I got 2 inches cut off about three months because I had BAD split ends.  Lately, I have been inspired by other blogs to do something with my hair.  There are many great hair style ideas out there and I really want to try a few, so I have decided to do a 10 for 10 thing on my blog.  This is the first time I am trying anything like this so hopefully it will work out.  I am going to be doing 10 different hairstyles for 10 days, starting right NOW!!!

This is the hairstyle that I did today:

View from the side


View from the back
 
View from the front/side
 We are going to call this hairstyle the "cinnamon bun".  Who doesn't love a good cinnamon bun?? 
This hairstyle took me only about 15 minutes to create.  Please excuse the frizziness.  This picture was taken after we had been outside at the zoo for two hours during a play date and it decided to rain/drizzle the entire time (even though weather.com said it wasn't suppose to rain until noon).  I probably should have taken a pic before we left. 

A great tutorial for this hairstyle can be found here.  Suze does such a great job and her hair looks so cute in this style.  *Note* - I put mousse in my hair while it was still wet and used hairspray when I was done.  I didn't have a single problem with it falling out.

This is actually the second time that I have done this hairstyle.  The first time was for a wedding about a month ago and this is how it turned out:


I don't know if anyone is interested in sharing hairstyles but if anyone is, I could set up a blog linky party on the last day of my 10 for 10 so that we all can swap hairstyles and you can show me any of the ones that you have tried out that I posted or any new ones that you have been wanting to try out.  Leave a comment below if you are interested!

Wednesday, June 8, 2011

Kokomo weekend

It is already Wed. and I am only now blogging about this past weekend.  The kids and I went to Kokomo, IN.  We used to live there when Leonard was with Delphi.  It is about a 5 hour drive from our current house.  I managed to only stop once, each way, for an hour to let the kids run around at a McDonald's to eat, get some energy out and stretch their legs.  This really worked well! 
Friday we left in the late morning and got to Kokomo around dinner time.  We stopped at our friend Sharon's house along the way.  She lives only 15 min from Kokomo.  Sharon feed us dinner then we went to play at a playground by her house.  The kids were so dirty!  On Sat., we played at a playground in town then went to a graduation party for the son of the pastor at our old church.  I really miss that church!  We knew so many people and were very involved.  I guess that's what happens when you have kids.  The babies had fun!  It was sooooo hot but to keep cool, Malachi kept getting sprayed with the hose and both babies played in the bins with all the ice and drinks.  It was great to see everyone!  After the party, we went to see my friend Michelle that I used to work with.  She has two kids that are right around the same ages as mine.  There ended up being a horrible storm and some funnel clouds were seen not too far from their house.  It was a little scary but we were ready to take cover in the basement.  Luckily, we didn't need too. 


Alyssa riding the bike


The boys riding the bike

All the kids eating dinner

On Sunday, we went to church then went over to see the Stages.  We had lunch with them and were able to see Patty's daughter Katie's baby.  She was so cute!  They are such a nice and welcoming family!   We also saw Sharon again and her granddaughter, Cassie.


Cassie and Alyssa blowing bubbles


Sharon, Cassie, Alyssa and Rosie

Sharon and Malachi

 Later, we went back over to my friend Michelle's house so the kids could play.


Michelle's boys playing with the bubble machine


Malachi poking the bubbles in the grass


 On Monday we headed back to Michigan.  It was a fun weekend but very exhausting.

Welcome home!